Kick Those Glutes Into Gear (And Stretch Those Hip Flexors)
There’s no way around it — injuries are the worst. As a trainer, I hear the same story over and over again: one day you’re training for a race and everything is going well and next thing you know, injury strikes!
So why do we accumulate these nagging injuries? Often times, repetitive motion is the culprit. Just think about it, you perform the same motion using the same muscles THOUSANDS of times per run. This leads to a muscular imbalance where certain muscle groups are under developed and others get used too much.
As a full-time trainer with over 10 years experience, I’ve seen it all: stress fractures, plantar fasciitis (I myself am prone to this one), bothersome knees, and more. When I ask my clients about their training routine, the majority of runners don’t include strength work on a consistent basis, often claiming they don’t have time or don’t know where to begin.
That’s why I’m working with the Runkeeper app to put together this Strength and Stretch Guide, full of exercises you NEED to do to help prevent the majority of these common running injuries. An alternative title for this this blog series could be “Why Strong Runners are Happy Runners.”
So let’s get going with some glute strength exercises and hip flexor stretches!
Strengthening glutes
The glutes are your body’s largest and most powerful muscle group, but for some strange reason, they don’t get the love they deserve. What a lot of runners don’t realize is that their glutes are seriously slacking—causing the hip flexors to take over and work their butts off (no pun intended). A big part of the problem is how much time we spend sitting. This causes us to lose strength and the glutes to stop firing. Luckily adding the following exercises to your weekly routine can help reverse these common problems and rebuild strength.
Below are five exercises I find to be the most effective when it comes to firing up my glutes—you’ll be burning the next day, in a good way. Do three sets of each exercise, following the recommended number of repetitions per move.
Curtsy Lunges (15 per side)
Step 1
Step 2
Step 3

Helpful tips: The curtsy lunge is a great lateral moving exercise that focuses on one side of your glutes at a time. I find that it works best if you have some sort of strap or band to hold (even a towel will do) to help accentuate the weight on your heel. When crossing your foot over to the other side, lower your opposite knee slowly to the ground to land directly next to the grounded heel making sure to display control throughout, then return to starting position. Add weight in one hand if needed.
Barbell Walking Lunges (20 total -10 each side)
Step 1

Step 2

Step 3

Step 4

Helpful tips: Using a challenging weight, set a barbell behind your neck and do walking lunges. It is important to make sure to lightly tap your knee to the floor on every repetition, as depth is key to reaching our glutes instead of just the quadriceps. Holding the bar behind the neck is also more effective than any other position due to the load of the weight being on the posterior side of your body. This exercise trains a great deal of balance and stability and what runner doesn’t need more of this!
Barbell 90° Squat with Hip Thrust (10-15 reps with heavy weight)
Step 1

Step 2

Step 3

Step 4

Helpful tips: The important things to keep in mind here are 90°, hip thrust, and barbell. These four things are the key to maximizing the impact of this exercise and getting the most out of it.
- Stand next to a wall or set something up behind you to help you gauge when you are at 90° in your squat
- Rest a barbell on your traps behind the neck holding it in place with your elbows up. This placement will add the majority of the weight to your posterior chain and get the buttocks firing rather than just the quads
- Bend your knees and squat to a 90° position
- Thrust the hips at the top of the exercise as you rise back up and flex your glutes as tight as possible. Remember the motion should be powerful but still tight and controlled.
Single leg hip thrust on bench (15 reps on each side)
Step 1

Step 2

Helpful tips: Remember to flex the glute and hold for a good second at the top, push through the heel on the ground (do not let heel come up off the ground), and don’t swing the opposing leg for momentum.
Fire Hydrants (30 reps per side!)
Step 1

Step 2

Helpful tips: This is a super simple exercise that works the heck out of your gluteus medius and will burn like no other if done right. Start in a table top position. Raise the right leg laterally to the side as high as possible without losing alignment in your hips, making sure to keep knee at 90°. Return to starting point but never let the knee touch the ground. Add ankle weights to make this exercise more challenging.
Stretching and releasing hip flexors
Relieving tension in the hip flexor is another key to achieving balance and preventing injury. It is important to remember to hold each for a FULL 30 seconds. Seriously, set a watch and breathe into the stretch. It will make a difference!
Kneeling Hip Flexor Stretch
Step 1

Step 2

Helpful tips: With one knee down on the ground and the other foot flat and pointing forward, push your hips forward. Take the arm that is on the same side as the grounded knee and bend it over to the opposite side while rotating the upper torso the same direction. To intensify the stretch, make sure to flex the glute on the side with the knee grounded.
Standing Hip Flexor Stretch
Step 1

Step 2

Helpful tips: Stand with your feet parallel with the right foot about 12 to 18 inches in front of the left. Bend your knee and lean into the right foot. You should feel a stretch in the left hip flexor. This is the same stretch as the kneeling stretch but some tend to find this one more effective or vice versa.
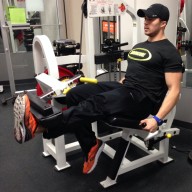
Partner Hip Flexor Pull

Helpful tips: It’s best to do this exercise with a partner on a stretching bench. The partner being stretched needs to make sure to hook the side that is not being stretched around the edge of the bench to add intensity to the stretch.
Please note: This blog is not intended to be a substitute for professional medical advice, diagnosis, or treatment. Always seek the advice of your physician or other qualified health provider with any questions you may have regarding a medical condition.